How to Winterize Your RV or Camper
If you are looking for help on how to winterize your RV, you've come to the right place. Winterizing an RV is easy to do and can generally be completed in less than an hour. follow these simple steps to winterize your RV.
Winterizing your RV may seem like a daunting task, but after reading these easy to follow instructions you'll be finished before you know it.
All Recreational Vehicles must be winterized if they are going to be stored in cold climates!
Some RV’s do have the features that allow the unit to be used in cooler weather, however, YOU MUST HAVE THE FURNACE ON AND RUNNING AT ROOM TEMPERATURE (65 – 75 degrees Fahrenheit). If your RV is equipped with the electric tank heater option, the furnace still needs to be operating. The electric heater only heats the holding tanks, not the plumbing. If there is fluid in the plumbing, and it freezes, it can cause the water lines to break. NOTE: It is the customer’s responsibility to fully research and understand their RV’s cold weather capabilities. Fretz RV is not responsible for freeze damage of any kind. Also, your manufacturer warranty does not cover freeze damage. Refer to your owner’s manual or consult with a Fretz RV sales consultant for a product’s cold weather capabilities.
Although most RV’s do have the equipment and features to assist with the winterization process, some don’t. It is Fretz RV’s recommendation that you read your owner’s manual or ask a Fretz RV service employee for product specific winterization procedures.
Step By Step RV Winterizing Instructions
Before we begin, here is list of tools and supplies you will need:
1. Non-Toxic RV Antifreeze (2-8 Gallons depending on your specific RV's on-board equipment) See diagram below for assistance
2. A socket set or open end wrench 15/16", 11/16" (depending on your specific RV water heater)
Now, let's get started!
1. Drain the water system - Drain all tanks including the fresh water, grey water and black water tanks.
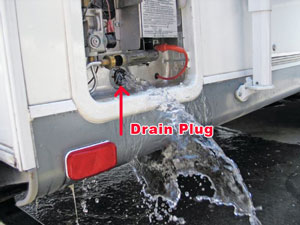
2. Drain the hot water heater - Make sure you relieve the pressure from the water heater tank using the pressure relief valve on the hot water heater. Drain the hot water tank by pulling the drain plug. Make sure you release the pressure ring while draining. The plug size varies with brand, but usually is between 7/8” and 1-1/8”.
NOTE: If the hot water tank is a 110 volt, it must be turned off prior to draining the tank. Failure to do so will cause the 110 volt element to fail.
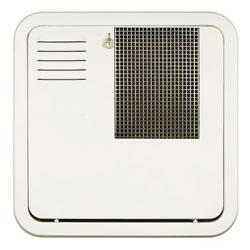
Tip: To locate your water heater, find the door that looks similar to the one photoed here on the exterior of the RV. To locate your water heater valves, go inside the RV where the back side of the water heater should sit. You might need to remove a basic screwed in or a slide panel to access the water heater.
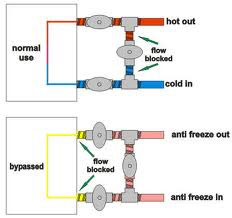
3. By-pass the hot water heater - The Hot Water Heater by-pass is designed to allow the water system to isolate the hot water heater. This allows water to flow through the system, but does not allow fluid into or out of the hot water heater. Most products have a provision for this. If yours does not, consult a Fretz RV service or parts employee for by-pass options.
4. Run RV Anti-Freeze through the system - Find the water pump and do one of the following. (1) If the pump has a by-pass, place the clear vinyl tube into a gallon of RV antifreeze and start the water pump. (2) If the pump does not have a by-pass, disconnect the hose from the suction or tank side of the pump.
Attach a hose to the suction side or tank side of the pump, and place the end of the hose into a gallon of RV anti-freeze. Start the water pump. NOTE: Never put RV antifreeze into the fresh water tank. It is very difficult to completely remove the antifreeze. Consult your owner’s manual or a Fretz RV service employee for more specific hose location and operation.
5. Turn on both the hot and the cold water on the kitchen faucet. Run the water until pure antifreeze come out of the faucet. Turn off the faucet.
6. Continue the process in Step 5 to all the faucets in the RV. Make sure you do each sink one at a time, and don’t forget the outside shower.
7. Open the toilet ball valve until pure antifreeze comes out of the valve.
8. Take the hose out of the antifreeze.
9. Let the water pump run until you hear a gurgling noise.
10. SHUT OFF THE WATER PUMP.
11. Open all the faucets in the coach.
12. Block the toilet valve open.
13. Drain off all water in holding tanks completely.
14. Open all gate valves.
15. Place cap on sewer connection.
16. Fill the traps with RV Anti-Freeze - Pour some extra RV antifreeze down the P-traps, approximately 1 pint per P-trap.
NOTE: If your RV has a washer/dryer and /or an ice-maker, please consult a Fretz RV service employee. The above procedure above will not be adequate.
RV Water Heater Access Door
Water Heater Drain Plug
RV Water Heater Bypass System
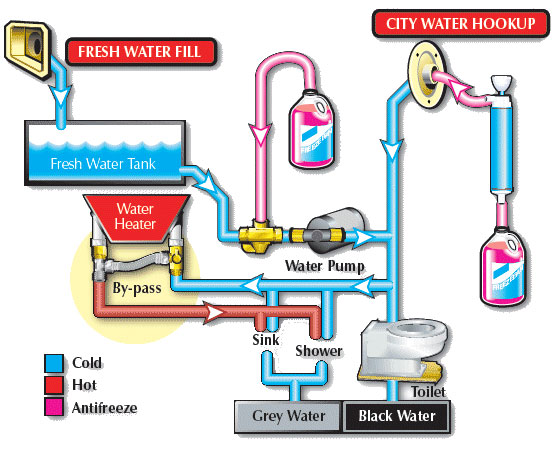
Basic Winterization Valve Diagram
Typical Water Heater Bypass Valves
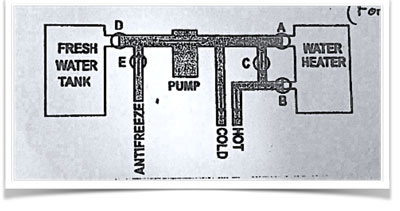
Valve A - Cold Water Intake
Value B - Hot Water Out
Valve C - By-pass valve
Valve D - Shut off for fresh water
Valve E - This is the pick up valve and hose (in available on your RV) for Anti-freeze.
NOTE: If you are experiencing hot water for a moment, then cold or just lukewarm water when your hot water faucet is turned on, check that your By-pass Valve (or Valve C in the diagram) is closed.
Fretz RV is not responsible for damage resulting from improper winterization of the water system. This serves only as a guide to basic procedure.